Getting Started with Web Application Development
eXist-db is much more than just an XML database. It is also an excellent platform for the development of rich web applications, based on XML and related technologies (XQuery, XForms, XSLT, XHTML...). This article describes one of the possible approaches and demonstrates how to quickly prototype an application, using the following key components:
-
A standardized packaging format for modular applications, allowing deployment into any eXist-db instance.
-
A set of tools to create application packages, integrated into our XQuery IDE, eXide.
-
An HTML templating framework for a clean separation of HTML page content and application logic.
-
A tight integration with XForms for fast form development.
-
A clean approach for the deployment of RESTful services based on XQuery code annotations (RESTXQ).
Those working on data sets in TEI may want to look at TEI Publisher also. It includes an application generator tailored at digital editions. The created app packages include all the basic functionality needed for browsing the edition, searching it or producing PDFs and ePUBs.
Packaging
eXist-db builds on the concept of self-contained, modular applications using a standardized packaging format. Applications live inside the database, so application code, HTML views, associated services and data all reside in the same place. This allows packaging an application and pass it to someone else for installation in another database. It might even be published to eXist-db's public repository. The packaging format is compliant with the EXPath packaging proposal, though it extends it considerably.
For distribution, an application is packed into a .xar archive, which is
basically a ZIP archive. The .xar archive contains all the application code
and optionally data.
The documentation, the dashboard, eXide and the eXist XQuery Features Demo are all examples of these application packages.
The packaging format includes descriptor files. These describe the application and
control the installation process. As an absolute minimum, an application package
must contain two descriptor files:
expath-pkg.xml and repo.xml. You can read more
about these files in the package repository
documentation. Detailed knowledge about these files is not required for the
following sections: eXide will create the proper basic descriptors for you
automatically.
Starting a New Application
There are many ways to start new applications on your local environment, we provide a yeoman generator to be run from your commandline.
The Default Application Structure
eXide has created an application skeleton for you which works out of the box. All
resources of the application reside below the target collection
(/db/tutorial).
The generated collection hierarchy follows a certain structure, which is usually the same for all apps which ship with eXist-db. The most important collections and files are described below:
/modules/-
Contains XQuery modules. The actual application code should go here.
/resources/-
Resources like CSS files, images or JavaScript.
/templates/-
Page templates containing all the repeating parts of the site's HTML layout.
collection.xconf-
A template file for the index configuration for this application. This file will be copied into the correct system collection when the application is installed. This causes automatic indexing of installed data.
controller.xq-
The URL rewriting controller, which handles the URL handling of the application. You will rarely need to change this for simple applications.
expath-pkg.xmlandrepo.xml-
Package descriptor files for the application. These contain the information you entered via the Deployment Editor. You don't need to edit these files directly. Instead, open the Deployment Editor to change any of the descriptor properties.
index.html-
The default start page of the application.
pre-install.xql-
An XQuery script run by the package manager before installing the app. By default, the script only ensures the index configurations (in
collection.xconf) is properly copied to the corresponding system collection.In addition to
pre-install.xql, you may also define apost-install.xqlscript via the Deployment Editor. As the name says, this script will run after the app is deployed into the database. It is most often used to copy resources or run initialization tasks.
You are not required to keep this structure. Feel free to restructure the app as you
like it and remove some of its parts. However, preserve the two descriptor files
expath-pkg.xml and repo.xml.
The HTML Templating Framework
The generated application code uses the HTML Templating
Framework to connect HTML views with the application logic. The goal of the HTML
Templating Framework is a clean separation of concerns. If you look at the
index.html page, you'll see it is just an HTML div defining the
actual content body. The rest of the page is dragged in from the page template residing
in templates/page.html.
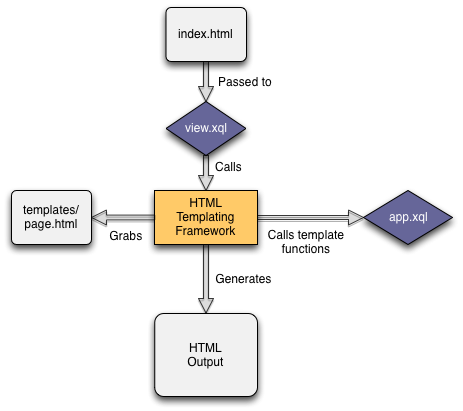
The controller.xq is configured to call the HTML Templating for
every URL ending with .html. The process flow for an arbitrary
.html file is shown below:

The input for the templating is always a plain HTML file. The module scans the HTML
view for elements with class attributes, following a simple convention: It tries to
translate the class attributes into XQuery function calls. By using class
attributes, the HTML remains sufficiently clean and does not get messed up with
application code. A web designer could take the HTML files and work on them without
being bothered by this.
For instance, if you look at index.html, the class
attribute on the outer <div> contains a call to a templating function:
<div class="templates:surround?with=templates/page.html&at=content"> templates:surround is one of the default templating functions provided
by the module. It loads templates/page.html and inserts the current
div from index.html into the element with the id content
in templates/page.html. A detailed description of
templates:surround can be found in the HTML templating module
documentation.
Add your own templating functions to the XQuery module
modules/app.xql. Or add your own modules by importing them in
modules/view.xql).
Example: "Hello World!"
As an example let's implement the traditional "Hello World!":
-
Create a new HTML view,
hello.html: Choose File, New from the menu and set the file type to HTML (drop down box at the top right in eXide). Add the following contents:<div class="templates:surround?with=templates/page.html&at=content"> <form action=""> <label for="name">Enter your name:</label> <input name="name"/> </form> <p class="app:helloworld"></p> </div>This creates a simple form and a paragraph connected to the template function
app:helloworldthrough its class attribute.Save the HTML view to the root collection of your application as
/db/apps/tutorial/hello.html. -
Open
modules/app.xqland add an XQuery function matching theapp:helloworldtemplate call:declare function app:helloworld($node as node(), $model as map(*), $name as xs:string?) { if ($name) then <p>Hello {$name}!</p> else () };A template function is a normal XQuery function with two required parameters:
$nodeand$model. Additional parameters are allowed (see below).$nodeis the HTML element currently being processed, in our example case a<p>element.$modelis an XQuery map containing application data. We can ignore both parameters for this simple example, but they must be present or the function won't be recognized by the templating module. Please refer to the HTML templating documentation for more information.The third parameter,
$name, is injected automatically by the templating framework. The templating library will try to make a best guess about how to fill in any additional parameters. In this case, an HTTP request parameter callednamewill be passed in when the form is submitted. The parameternamematches the name of the variable, so the templating framework will try to use it and the function parameter will be set to the value of this request parameter. -
Open
hello.htmlin the web browser using the base URL of the app:http://localhost:8080/exist/apps/tutorial/hello.html
Fill out the box with a name and press return.
Exporting the App
Once you have created the first pages of an application, it is a good idea to export
it to a folder on disk. One way to do this is choose Application,
Download from the menu to create a .xar archive of the
application. You can however also export the app to the file system which has the
advantage that you can continue working on the app and have eXide keep track of which
files were modified since the last export. With a copy on the file system you can also
add it to a version control system like GIT or SVN.
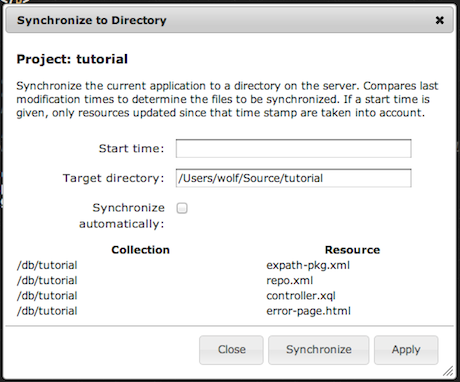
To create an export to the file system, click choose Application, Synchronize from the menu. In the popup dialog, fill in the path to the desired Target directory:
-
If you are accessing eXist-db on a server, not the machine you are opening eXide in, this must point to a directory on the server running eXist-db, not your local file system.
-
If you are running eXist from your own machine use this.
The Start time can be ignored for now. It will show the date/time of your last export when you synchronize again.

Clicking on Synchronize starts the export. The names of the resources written show up in the table at the bottom of the dialog.